Showing posts with label Platters. Show all posts

Tuesday, December 24, 2024

Plate-O-Matic


I learned this super-easy slab technique at the Kansas City NCECA conference. The conference used to feature a space they called the Process Room, in which artists would do quick, half-hour demonstrations of a specific process. (Fun fact! I demonstrated oval stretched butter dishes in that space, at the same conference.) The Process Room was wildly popular; it required an overflow room, and many conference participants parked themselves in the front rows for two solid days. It has not been a feature of recent conferences. I don't know why but if I had to guess, I'd say it's because it was a boatload of work & we didn't get paid? Just a guess. 

But I digress.

In the video I use a repurposed hump mold made of fiberboard from GR Pottery Forms. They are intended for potters to drape slabs over top, then pop the clay off after it's leatherhard, and they do work well for that purpose, but I find the platters made that way to be quite static. The Plate-o-matic process allows for some post-forming manipulation, so the resulting piece can be more dynamic and fluid. If you prefer, you can make your own plate-o-matic dies out of 1/2" slabs of clay, cut to shape & bisqued.

I've got a new video for paid subscribers at my Patreon page, demonstrating this technique! Check it out at this link.  

Monday, May 31, 2021

A Maker's Journey


I & the other members of the professional organization I belong to, the Central Maine Clay Artists, will be part of a group show at Monkitree this summer! I've done many fairs & sales but it has been years since I've had work in a gallery show. 

There are reasons for that!

When I was young and full of energy, right out of grad school, I planned to be the kind of academic potter who got on the cover of Ceramics Monthly. I applied to themed gallery shows alot. I got in sometimes, too! Trouble was, I had to charge so much to cover the jury fees, which were $25 -$45 (a pile of money in 1992 making $6.75/hr) - and you have to charge enough to cover the shows you applied to & didn't get in, also - the shipping to & from (and again, prices had to cover the shipping costs of the ones that didn't sell - and the packing material. The galleries always took 50%, too, which I never minded - a good gallery earns that fee, and it costs money to keep a business like that open - but it meant I had to double all those previous fees in order to cover them. I was making functional ware, so if I applied with, say, a pitcher, it might have to be three or four hundred dollars. Which made it harder to sell. Which meant the price of the ones that did sell had to go up to cover the shipping and so on of the ones that didn't, etc, etc, world without end, amen. Were there people willing to pay those prices, in the 90s, for functional ware? Sure, and there are now, too, but mostly for the work of potters they've heard of. If the price was a vicious spiral, reputation was whatever the opposite of that is - a fortunate spiral? If you became known, more people were willing to pay more money for your work, and that increased your reputation so that more galleries wanted to carry you, creating scarcity, pushing the price you could ask up, etc, etc, world without end, amen. It does work for some people! Maybe they are better potters, maybe they were luckier, maybe they were better at networking. No shade here - I'd have done it if I could have picked that lock. 

All of that also applied to time - the time I spent applying, packing & shipping ware, unpacking the ones that didn't sell (not to mention the time & cost of bringing pieces to a professional photographer, which was the only option, then) was time that I didn't spend making stuff, resulting in fewer pieces to sell. 

Anyway I stopped doing that once I started doing art fairs & discovered the joy of selling directly to the people who were going to use the pots. Art fairs cost money & time, too, but the ratio of time making/time selling/money made was a happier one for me. I supplemented - I still do - with consignment & wholesale. 

Yikes that was a long & mostly irrelevant story. But a gallery show after all this time is exciting! Especially since I get to skip over all the tedious applying and shipping. The show is called Exploring Maine: A Maker's Journey:

Potters explore new shapes and designs with Maine in Mind.  

​

Central Maine Clay Artists offer artistic and functional designs that allow you to take Maine with you. Each of the clay artists has their identifiable style but with this show they are exploring new shapes and designs that gather inspiration from the state that offers so much- powerful ocean, scenic lakes, rugged mountains, delicate wildflowers, exceptional dining, dramatic seasonal changes, and so much more. 

I love the theme, because, you know how you've got your body of work, and you like your body of work & want to keep making it, but there are also a bunch of other, half-formed ideas pressing on the inside of your head? Maybe you make them but they don't fit with your main work so they sit in the studio getting dusty, or maybe you don't quite find the time to make them. This show is specifically for those ideas. For me, it's the torn-edge dark clay slab plates & platters. I have a few, and have committed to make about 15 pieces for A Maker's Journey.  


Wednesday, March 11, 2015

Sling & Slip


Though I'm in the firing end of the making cycle in the studio, I am still doing wetwork demos for my classes. This platter is made by securing cloth over the top of a container and then draping a thick slab over it. Some call it a sling mold (say this in the voice of Billy Bob Thornton.) I like sling molds because any size platter you want to make, there is a container in the world that will serve as the mold for that platter. Look in the home storage department at Target for larger ones, or in the food storage aisle at the grocery store for smaller ones. This one if held in place with rope but a big rubber band would work or, if your mold is wood or cardboard, you can staple the cloth in place. I leave the clay quite thick - maybe 5/16ths inch. I hate a flimsy platter.

If I catch this platter at the exact right moment I won't need to put a foot on it: I can just take it out of the mold and tap it on the tabletop to flatten the bottom. If I miss my moment, I'll throw a ring for the foot.

It was two demos in one: I showed my students how to make the sling mold, and then used the platter I made to show them a couple of slip techniques. The checkerboard pattern I made by cutting squares of newspaper and sticking them to the damp clay, then brushing white slip over them; the flowers are a brush embroidery technique.

But that was yesterday, and yesterday's gone. Today I a back in the glazing/firing end of the cycle. I'll be applying flashing slip and waxing pots all day.

Saturday, April 5, 2014

Everything Happens for a Reason But Sometimes it's a Stupid Reason

In ceramics, everything happens for a reason.

Like, the interior of this otherwise-very-nice sugar bowl is dry and rough, and the reason for this is, some dumbass (ahem) forgot to glaze the inside.


And sometimes, in clay, you never figure out the reason, and that's okay, because you can solve things without knowing it. For example: I have a yellow glaze, Old Yellow, that's always been a little funny about what bisqueware it likes. If the bisque was a little too cool, it wouldn't adhere well, so I would get crawling, and sometimes sheets of glaze falling off. Uncool! But a simple fix: bisque higher. I used to bisque to ^010; I upped it to ^08. Problem solved, for years. Now this firing, I am starting to see evidence of that old crawling problem again.

But why? Same glaze, same clay bodies, a good solid 08 bisque...all the variables the same ones that have been working for years. There has to be a reason; everything happens for a reason. I just don't know the reason.

I see two possible solutions here: water the glaze down a bit, or fire the bisque a little higher. I'll probably try option 1 first, cheapskate that I am.

Lucky for me the crawling was slight, not really enough to create flaws. 

Otherwise a very good firing! These pots are bound for Monkitree, and also for my yard. Maine Pottery Tour is coming up.
PS: Also in the category of "Everything happens for a stupid reason" I submit my latest soap batch!

Goat's Milk, Oatmeal and Honey...looks like a loaf of poo, smells like ammonia. Ugh! It was worse when I first unmolded it, covered in a thick layer of oily brown yuck.Apparently honey is very prone to make soap overheat and separate. It can be rebatched but won't have the nice gold-brown color one hopes for with goat' milk soap (the round cakes are okay, though.). I plan to try again, but sadly the new batch probably will not be ready in time for the Pottery Tour.

Wednesday, February 19, 2014

A Good Day for Platters

I don't really make platters. I mean, I don't not make platters; I'm not morally opposed to platters. But they are messy to make, slinging a lot of slurry around, and they have a really high loss rate due to warping, cracking, and big bubbly blobs of soda glaze landing on them. (Anything wide is at greater risk of big bubbly blobs.)

But it's February, and these platters can dry for months if need be; and anyway I just felt like it. Truth be told I really just wanted large surfaces to decorate!

I started with the largest one. I was playing with different methods of slip application, trying to get different qualities of line. I used a standard metal-tip slip bottle, a ziplock bag with a corner snipped off, and a pastry tube with a small star tip. You can see the lines here:
L to R: Pastry Tube, Slip Bottle, Ziplock baggie
I had in my mind an image sort of like a Japanese cherry-blossom painting; like this

or this
or this

I wanted to capture something of that feeling, but not try to simply make a slip-duplicate. They have a loose/tight quality...a perfect imperfection...that was the feeling I was looking for.

I started with my new best friend, food coloring:


 Then I used the pastry tube, which made the thickest line.
On to the thinner lines:


And finally to the blossoms. Here I had a decision: I could go with the more literal slip-embroidery look, or just suggest blossoms with slip dots. I went with option B.


So....hmmm. Not sure if it reads in the photograph, but that is some really high relief. (Click the photo to see a larger version. The depth of the relief is evident) It's wonderful and gooey and very appealing, but now I am wondering if it will compromise the function of the platter.
 
Think, think, think, says Pooh.

Sometimes, as it dries, slip flattens out a bit.  Maybe that will happen in this case. If it doesn't, I can still try sponging the slip-relief. That will flatten it out, and also soften up the image...for good or ill.

Still have two platters to decorate!


PS. Here's the beginning of the next one, which will have sprigs and a scalloped border of slip dots.


Thursday, October 4, 2012

Mishima in a Sling Mold

Mishima, misleadingly named for a Japanese city from which it did not originate, is a method of inlaying slip, engobe, or soft contrasting clay into carved or impressed texture. As I'm still having fun with my homemade texture roller, I decided to try some mishima decorating with my Monday-funday Handbuilding class. It worked so well I reprised the demo for the Tuesday Afternoon Delights and the Tuesday Awesomeness gang.

It was a sort of two-fold demo: I started by making an ad hoc mold from a rubbermaid bin and an old sheet. This is great if you want to build a larger platter or shallow bowl than you have a mold for; any container can become a sling mold. I just lay the sheet over the top, then tie a rope or bungee cords around the bin to hold it in place.The device looks a bit like a bassinet, when the sheet is secured in place. You can adjust the curve to be deeper or more shallow.

I rolled out a relatively thick slab - 1/4 inch or thereabouts. I then used the handy-dandy hot-glue texture roller that I made a couple of days ago in my home studio to impress a texture, before laying the slab in the mold. I trimmed the edges, and then lightly paddled the edges to compress.

I left it alone for a couple hours, hoping it would firm up some, but it really didn't; it was raining outside and quite cool in the studio, and of course the bin was plastic. I decided to go ahead with the mishima so the class could see the technique, even if it was less than ideal; but actually it worked just fine even on wet clay.


I spread thick slip from the sides of the bucket over the surface of the platter, then used a rubber rib to remove most of the slip, leaving behind whatever had sunk into the texture.
After letting the piece dry for a few more hours, I added a rim, made of flattened and stretched coils. Once it was leatherhard enough to move without distortion, I threw a foot - basically just a cylinder with no bottom, which I altered to be a loose rectangle - and attached it by laying the platter on top of it, while the foot ring was still quite wet. 
I ended up altering the foot much more than it appears at the top of this post, because the foot seemed so...static - in contrast to the loose, dynamic rim. (This is a constant issue when combining thrown and handbuilt elements.)


This piece will not be dry enough for the next bisque, but will make it into the one after that; I expect it to be finished around the end of this month.If it comes out especially well, I'll list it in the Pottery Shop!

Saturday, September 29, 2012

Goodwill Find

When I am throwing enough pottery to fill the kiln on the schedule I need to keep, I sometimes find myself nursing a repetitive stress injury. It's a quandary, because - obviously - I have to stop throwing long enough for my wrist to heal. Answer? Why, handbuilding, of course!

Using an existing piece, glass or metal, as a mold has never been my favorite way to work. It seems too...what?...derivative, I suppose. So often all of the details are just impressions of a surface some other designer created. Why should somebody else have all the fun? When I found this silverplate oval platter with no texture or detail at Augusta's new Goodwill store, I saw a solution to both my problems. Because it is a featureless piece, I can go to town on it.

I made a texture roller using a fat piece of dowel from Home Depot, and a hot glue gun. Advice: if you are purchasing a hot glue gun for this project, get the more expensive one. I got the little $2.99 special, and found that it squirted out so little glue at a time that keeping a steady line was impossible.
Still, I managed a spiral design. I stretched out a slab, about 1/4 inch thick - I hate a flimsy feel to my pottery. Then I rolled the decorative roller over it, in several directions, so the rough quality of the drawing became a non-issue.


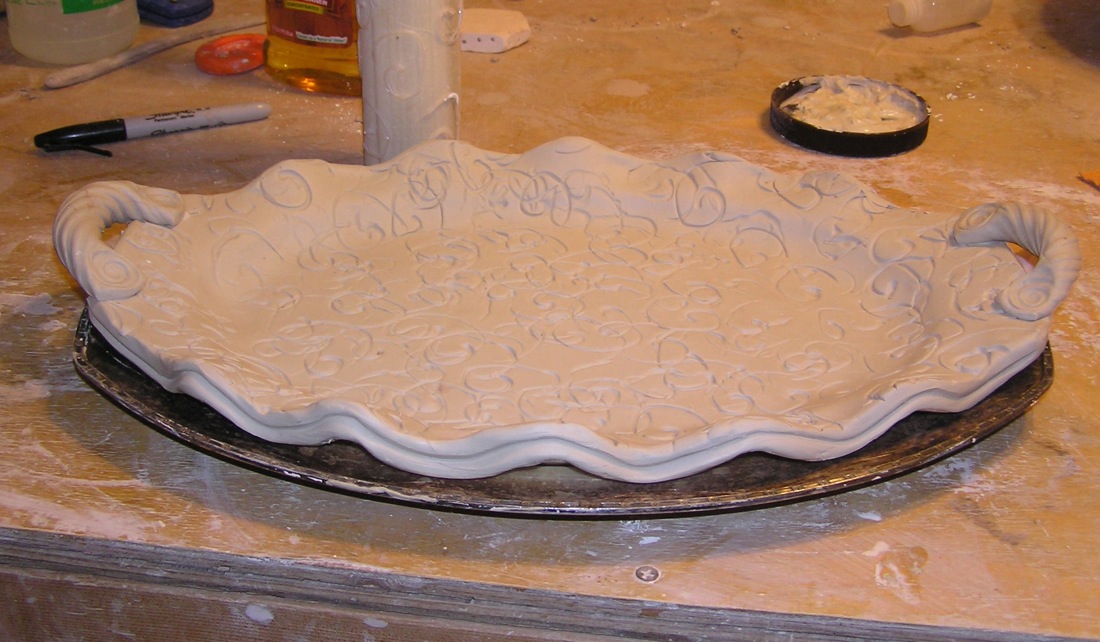
Then I slathered the mold with Murphy's Oil Soap, as a release agent. Clay will stick to anything nonporous, so don't skip this step. I placed the slab texture side up inside the mold. This particular shape would also work as a hump mold - turning it upside down and laying the slab over the exterior. (That's the next one!)I used to fettling knife to cut a more interesting rim.
Then I picked up the mold, slab and all, and dropped it from a few inches above the tabletop, 3 or 4 times.After that, I used my thumbnail to dig a ridge all around the edge, for a double-rime appearance, and attached textured handles.
Last, I trailed slip in a design loosely mimicking the pattern left by the roller. Voilà! A molded platter that retains sometihing of my aesthetic.


Saturday, November 21, 2009

Another Step Along the Way


One nice thing about platters is that I get a larger surface to decorate. Though I often use a single large stamp as a focal point, this time I went with an overall, wallpaper design. It actually looks a little wallpaperish, perhaps in a Victorian home.


I made the roller of clay. It works best bisqued, because if I leave it green, it falls apart relatively quickly. Some potters see this as a plus, as it forces them to remake their decorative tools regularly; but I get too attached to mine. I hate reaching for a stamp or a roller, only to find that is has a big chip out of it. The little squiggle you can see in the photo above the slip bottle is a bit of wire I use as a stopper; that way I can store the slip (or glaze, depending) right in the bottle without having the tip clog up. 

Expected firing schedule: Bisquing Thanksgiving Day (Doug's gonna have to be in charge of that one, as I will have my hands full of turkey, turnip, pies, and so on); glaze firing December 5, unloading December 6. Do you ever have a terrible temptation to do what you know hardly ever works? I am dying to glaze only the middle spiral, and let the soda work its magic on the rest, because the contrast of the clay & slip can be so handsome. But in my experience, soda doesn't take to the horizontal surface that well, and firing them on end has resulted in major warpage in past. Still, I've got plenty of time to decide. 

Maybe I should do "100 Platters in 100 Days!" Yeah, right. 

Thursday, October 29, 2009

More Pots from the Last Firing


I was too lazy to do the whole photo set up, when I just wanted to record a couple of pieces before I (ahem) sell them. The top bowl is the one I shot unfired two posts ago; as you can see, it looked better prior to firing! Oh, well, sometimes that happens. I like to tell my students, "If you aren't failing, you aren't trying."
I am pleased with the large red platter, and the little test cat dish, too.

Friday, May 22, 2009

One Down...


Three to go.

Wednesday, October 29, 2008

Slip Trailing


Decorating with thick slip is one of the most relaxing things I do in the studio. Making all those tiny dots or squiggles can be quite hypnotic. I use a white and a brown trailing slip, one each made from the clay bodies that I use in the studio, which are Miller Clay's B-mix 10, and their #700. I used to mix clay from my own recipe; I stopped, but that is a whole 'nother post. Today I mixed up brown trailing slip.

Every studio should have a blender. I got mine at the Salvation Army for $4, (after hubby fried my old one, also a thrift store find.) I also use a palette knife, just in case I have to stick something in the blender to work the clay mass loose. Even if the appliance is unplugged, those blades are sharp!  I fill the blender about halfway up with slurry from my recycle bucket, then hit "liquefy" on the settings. I'll have to add water a couple of times, trying to get to a cake-batter consistency.After pouring it into a plastic tub, I thump the container on the tabletop maybe about twenty times, to get the air bubbles to rise up and pop. This is an important step; if you skip it you will be slipping along, making tiny little dots, when your bottle will suddenly make a flatulent noise and spit out a messy splatter of slip, and you'll have to sponge it all off and start over again.
My brown slip trailing bottle has two tips. (I use seperate bottles for the white slip.) The broad tip is great for fluid lines; the pointy tip makes dots.
And here's another 'tip' for you: you can star making those fluid lines off the side when you are decorating a platter, so that the "starting blob" is left on the tabletop not on the platter. 
I get inspired to do slip work looking at Steven Hill's platters, like this one.