Wednesday, January 30, 2013

Winter, More Winter, and Mug Season

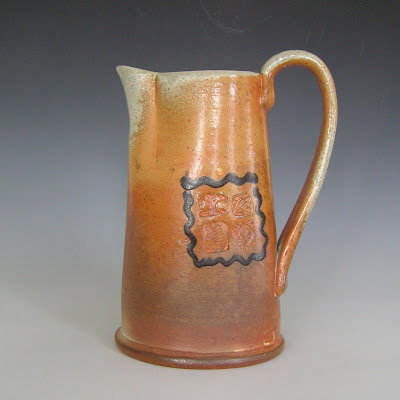
Eight mugs for the Central Maine Clay Artists' Mug Season fundraiser. Twenty bowls for Watershed's Chowder Supper fundraiser. Today's output was all for charitable purposes.

I haven't got a lot of money to give to charity but if a group can take a donation of pottery, I'm right there.

Mug Season - a play on the old joke about Maine's three seasons (namely winter, more winter, and mud season) - is an annual event during which the potters of CMAC each donate 6-10 mugs which are then sold at local coffee shops for $15, full of coffee. We then donate the proceeds to support arts education, a different program each year. This is the first time I've participated. Here's the Facebook page for last year's event; we're not yet on top of this year, but it will run through March and April.

If you are in Central Maine, ask at your local coffee shop if they are carrying us. My mugs, like those of most of the other participants, are usually $22 - $25 (and likely to be higher, soon) so $15 for both mug and coffee is a bargain. Local schools benefit, as well; last year we made donations to the art programs of seven schools; this year we are thinking of choosing one or two recipients, in order to make a larger contribution to each.

The mug above was made by Malley Weber, one of last year's participants. To see more of Malley's work, click here.

In other news, my replacement digital scale arrived today! This one is an i5000; a bit more expensive than the 7001DX, but it has the advantage of actually working. It has a lesser capacity - 5000 g vs 7000 - and measures to single gram accuracy. If I need fractions of grams, I can borrow my repaired triple beam back from the soaping closet where it currently resides. Not a moment too soon, either: I need to mix test glazes for this weekend's ^6 reduction soda test firing! My frineds & fellow potters Liz Proffety and Karen Dyer Discenso are joining me. Photos soon: the good, the bad, and the unexpected!

Sunday, January 27, 2013

Brick Repair

Remember when I cast those giant bricks for the door of the kiln? And I couldn't talk about anything except castable for a couple of weeks? Well, now those bricks are in rough shape. They've served well in that they are much more insulatory than reguaar hardbrick would be, but they are pretty brittle, and some of them are in so many pieces that it's just silly. It's just short of bricking up the door with rubble.

I got some furnace cement from INFAB, and today I am setting to work sticking these babies back together.
Luckily I've kept all the pieces together; otherwise this would be a nightmare job. As it is, its just glue & stick, glue & stick. The specific product I'm using is Quick Bond 3000,  a high-duty air set mortar...maybe some kind of epoxy mixed with fire clay? I don't know. I do know that it adheres faster and better than I expected. It remains to be seem how well it will hold after firing. I wouldn't be surprised if those joints were far more fragile than the brick itself, in which case I'll either have to just keep pasting, or re-cast the blocks. 


While I've got the bucket open, might as well repair a few softbrick, too:


Kiln maintenance isn't my favorite thing, but it's gotta be done.

Saturday, January 26, 2013

Anybody Wanna Buy Pottery?

 Set of three fitted bowls, $75


16 ounce stripey stoneware mug, $25


Flower Brick with latticework built-in frog, $45
About 7" high


 30 ounce pitcher with stamp and slip details, $50


12 oz shino mug, $22. This one got that amazing iridescence that shino sometimes does; there are more photos at the link.

Friday, January 25, 2013

Tulips in Winter

Nothing like something blooming to brighten up a frigid day.

I took some photos of pots today, and plan to edit them before calling it a day. This one is my favorite.

This piece is $45, available here.


Thursday Inspiration: Nick DeVries


You can see more of Nick's oxidation-fired stoneware here, and shop for his work here.

Thursday, January 24, 2013

Bowls 101 - My Acting Debut

So, in preparation for my Kickstarter project, I am trying to learn how to operate this video camera a friend lent me. Though video cameras and camcorders - is there a difference? I don't even know - have been around for a long time, I've never had one, and never really been interested. My husband has had a couple that he uses professionally, but his tend to have short life expectancies: they get dropped in waterways, or knocked from desktops in his chaotic workspace. Though he expressed willingness to help with this project, accepting his help meant getting in line behind his professional priorities - and I know from the website update that that can be a long wait. 
Or, there's always the option of figuring it out myself. Gazillions of people make videos for YouTube. How hard can it be? 

Well, not that hard, but the hard parts were not the ones I expected. Using the camera was simple: set up the tripod, press a couple of fairly obvious buttons...that's about it. Editing the video - not that I did much editing - seemed pretty simple, as the software , Movie Maker, had macros (or macro-like functions) for stuff like fading to black and making titles. No, the hard parts were:
  1. Saving the movie: it defaulted to a postage stamp size, the absurdity of which made me laugh and also persevere, because it was so silly that it couldn't be the only available format. 
  2. Talking. Just, you know, talking in front of the camera. I could barely make myself do it. I kept thinking of other things I had to do first, like clean the toilets. When I finally began I had to start over about six times. I can't tell you how silly I felt, talking through my standard first-night beginner demo, for no one.
That's all a lot of build up for a demo which will be old hat for most readers of this blog. Nevertheless, without further ado:

Sunday, January 20, 2013

Slippers and PJs and Snow

It's been so long since I fired, the details seem new to me. I got up at 5-ish this morning (that part's not unusual) and immediately - before feeding the cats, or making coffee, or anything - stumbled out in my bedclothes to brick up the small opening I left in the door of the kiln to let the moisture escape from my bisque firing. It was snowing lightly. I had forgotten the smell of steam coming off brick and the whisper of the burner. I had forgotten the warm feeling of accomplishment that still accompanies firing: I am powerful! I am forcing alpha quartz to become beta quartz! (Later, in the glaze firing, I will force beta quartz to become cristobalite, but that's later.)

Pre-coffee thoughts, I guess.

By tradition I clean house and studio during firings. My house could use a good once over or perhaps a quick run-through with the Alpheus and Peneus rivers, my studio is still very tidy. Since my big clean up and reorg last month, I've been setting the timer for 5 minutes at the end of each work day, and putting everything back where it belongs. So much nicer to work in an orderly space! Of course, I can do that, right now: it's still winter. Time is leisurely because there are no deadlines, no orders, no shows. Ask me in June if I am still tidying the studio every day.

My to-do list, then:
  • Clean house
  • Figure out this video camera that a friend lent me. For Kickstarter, I need a video, and while I haven't a clue how to operate a video camera, or how to turn the contents into something watchable, how hard can it be? 
  • Throw bowls. I haven't thrown bowls in forever, and I woke up this morning with a powerful yen.

Saturday, January 19, 2013

Stacking Jars, Part 2

Finally my stacking jars are leatherhard & ready to finish! I close off my studio when I am not in there, to save on heat, but as a result it's really, really cold in there - like see-your-breath cold - and things dry ridiculously slowly. Anyway! Here's the step-by-step to finish the stacking jars:

When the jar is leatherhard, cut the lid free at the bottom of the uppermost notch. Place it upside down in the rim of the cylinder; trim the outer edge to remove any ragged or uneven clay.
Now remove the lid and set it aside. Trim the inner edge of the top section. If your wheel can turn clockwise, and you are a rightie, try it this way! It's much easier to trim inner edges clockwise.

Replace the lid, which should now fit snugly into the upper rim. Using the fettling knife, cut off the top section, again at the bottom of the notch. Trim the edges so the top section fits into the bottom section. Repeat with the next section.


Add a slab to the bottom of the top two sections, to make it into small jars with a lids, that function as lids for the jars below them.


This set is quite small - useful for earrings, or maybe as a spice jar; but if I made a much bigger one it would make a nice coffee/tea canister.

Bonus idea: 
I threw a slightly larger one, with only two sections. Put a spout on the lower part, and you've got a stacking sugar/cream set!

Friday, January 18, 2013

Shout Out!

Just wanted to say congratulations to my friend Brandon Lutterman, who recently got the news that his teapot was selected for Lark Books 500 Teapots, due out in August of this year. (You can pre-order the book here.)
Way to go, Brandon! Can't wait to see what else author Jim Lawton has chosen.

Thursday, January 17, 2013

Thursday Inspiration: Ronni Aronin

I had a tough time finding many images of Ronni's work online, but I have a small porcelain dish that I got from her in a trade at the...1999?...Baltimore ACC show. I love this little dish and the spontaneity of the brush strokes, and I wanted to share her work with all of you. You can see more of Ronni's work here.

Wednesday, January 16, 2013

Stacking Jars, Part 1

I've always loved to make those lidded jars that are thrown in one piece, notched, and then cut apart to form lid and jar. (You can see one here.) I don't know why, but it never occurred to me before today that you don't have to stop with one notch! If you make two, or more, and then add bottoms between sections, you've got a set of stacking jars. Like so:

First, pull up a cylinder and collar it in until it is closed.

 Then, use a rib to scrape off the wet slurry on the outside, and to shape it into a flat-topped cylinder.

Then, with the fat end of the needle tool held at a 45º, press into the side of the wall 1/3 of the way up.

Then do the same thing 1/3 of the way down, and about 1/4 inch down.


Poke a pinhole at the bottom of one of those notches.

Tomorrow, when this gets to leatherhard, I'll show how I cut the sections apart and add bottoms to make stacking jars.

Tuesday, January 15, 2013

The Magic Twanger

I had another moment of clarity yesterday. That's two in a few short months! Keep em coming.

It went like this: I was in class trying out paste-slip decorating with a pastry bag, like cake decorators use. (More on that later.) My first efforts were a little sloppy, as were all the others, but the first ones more so. It crossed my mind that they appeared to be deteriorated, or weather-worn or...images flicked through my mind of crumbling Corinthian columns; tattered lace dresses with the beads coming off; Miss Havisham's wedding cake. Opulence decayed. Twang!! I heard, or rather felt the deep chord in my brain: my magic twanger. Suddenly it made sense. Why nothing will do but soda firing: I live for the pots that come out with parts of my careful decorating softened and undone by the vapor glaze. Why so many of my photos are images of decay.
Why soaps, the more elaborate the better; because, the moment you use a soap, however fabulous it may be, it immediately begins to dissolve.  Why gardening, even - what is a garden except a monument to the cycle of decay and regrowth?

My Magic Twanger is the Second Law of Thermodynamics! This feels like discovering that your fairy godmother is in fact the goddess Nyx (perhaps not coincidentally born of chaos) or that your Secret Santa actually is Santa. Or, you know, Oprah.

The Law of Entropy doesn't account for all of it, of course: there's still the connection to bright, over-decorated, frivolous things sweets and circuses, which is a huge aspect in itself. Maybe I have more than one magic twanger, or maybe it's just highly nuanced. But still. I have to think some more about this. Entropy.

Things that make you go hmmmm. If you're me.

Sunday, January 13, 2013

Vintage Embroidery Patterns

By coincidence, a student brought me some vintage embroidery patterns that had been her mother's- refugees from a general household clean-up and declutter - the same day I came prepared to demonstrated brush embroidery. The students were enthusiastic about the technique, while I couldn't wait to see if I could put these patterns to use.

My first idea was to lay the image on the clay - a platter in this case, made just minutes before - and trace the lines with a blunt tool. That worked, sort of, but the paper is unbelievably fragile, and kept tearing. I hadn't read the directions - oh hell no, who has time for that? - or I would have already known what I discovered next: the blue lines of the image are water soluble, intended as a press-on transfer. Like this:


Next I drew over the faint blue image - if you look close you can see it - with the slip trailer, and used the stiff brush as in the brush embroidery video.

There are a world of embroidery transfer patterns out there, both vintage and current, but once I have used these - mostly in class, probably - I am interested in if you could do something similar with a water-soluble marker, and make your own.

Maybe we'll try it in class this week.

Four VC Glazes

I spend my evenings now paging through the Cushing Handbook, looking for ^6 glazes that might perform well in soda, for the upcoming test firing. None of them are specifically meant for soda, but I'm looking for things that meet the criteria offered by June Perry in her very helpful comment here. I'm also trying to stay away from barium.

I've found a few that fit, or will, with some minimal alterations:

VC Transparent Glossy 3 (Gonna have to give that - or its descendant, if I alter it, a more succinct name!)

Custer Spar       40.0%
Gerstley Borate 18.0%
Whiting              16.0%
EPK                   10.0%
Flint                    16.0%

This sounds like a good base glaze. I'd like to get a good chartreuse or spring green without barium. 

VC 71 Base
Neph Sy           24.0%
Frit 3124             9.0%
Whiting              16.0%
Talc                     9.0%
EPK                   10.0%
Flint                    16.0%

Just listen to the description:  "Wonderful surface. Really sensuous smooth matt. Has a kind of glow like looking at a pearl. All the colors keep this same character; a gorgeous base glaze.- V.C." I don't just want to mix this glaze; I want to sleep with this glaze! Sadly, it's characterized as an oxidation glaze but it can't hurt to try it is reduction.   

VC 72 Base
Neph Sy            24.0%
Dolomite            11.0
Gerstley Borate  12.0
Whiting                4.0%
Zinc Oxide           2.0%
EPK                     7.0
Flint                    40.0

This one is described as a little more glossy but with a glow; Colors break with some texture.

And, finally:
VC Easy Gloss 1
Gerstley Borate 50.0%
EPK                  50.0%

I have no particular reason to believe that this glaze will perform well in soda, but I am a sucker for a 2-ingredient glaze. It seems worth it to test it, on the off chance that it will work  and I'll forever more have a recipe that is a joy to mix.

Of course, I am still without a scale, because the one I recently ordered bought the farm after only one use. I contacted the Big Ceramic Store, who, bless their hearts, offered to credit me towards any other scale, or refund my money. That particular model - 7001DX - has been discontinued. It seems I didn't just get a lemon, they are all defective. Despite the bum scale, I am pleased with how the Big Ceramic Store handled it: they got back to me right away, and were as helpful as could be under the circumstances.

Anyway: it's amazing how quickly I got spoiled. Mixing with the digital scale was so much faster and easier than using the triple beam that I never want to go back. I did repair the triple beam (more or less) for using in my soaping hobby, so technically I could just bring it back for studio use, but I think I'll wait.


Saturday, January 12, 2013

Drive-by Post: Cherry Valentine Soap

My latest soap!

Not pottery-related, I know, but I'm so pleased I had to share.

Later today: an update on the digital-scale saga, and two recipes from the Cushing handbook.

Friday, January 11, 2013

Hold Your Horses on that Scale!

If you were thinking of purchasing a scale like the one I bought - a 7001DX from BigCeramicStore.com - DON'T!! Even at $54 with shipping, it was not such a bargain - or not yet. It worked for two test batches of glaze, and then turned itself off and will not turn back on. Aggravating! I've replaced the batteries with fresh twice - one set was brand new. No joy.
I've written to the support team at BigCeramicStore to see what they have to say about it.

Cone 6 Test Recipes

Blair’s Red Variation
Flashing slip: apply to leather hard on the dry side

Neph sy 15
Grolleg 20
Helmer kaolin 65


Add 5 Neph Sy
This is a slightly altered version of Mark Knott's red flashing slip; I've increased to Neph sy a little


Water Blue cone 6 (Julia Galloway)

Gerstley borate 6
EPK 7
Frit 3110 77

Flint 10
Bentonite 3
Add
Copper carb 1 – 5% (I used 3%)
Cobalt carb .5% - 1%(I used .5%)
Or try stains in the 2 – 5%


Smooth Orange Flashing Slip
Apply to leather hard
  
EPK 40 
OM4 ball clay 40
Borax 5
Zircopax 10
Neph sy 5


This is also a Mark Knott recipe. 

These are sort of the low-hanging fruit: recipes that are available online, that people who already fire Cone 6 soda are using.I admire both Julia's and Mark's work, and plan to incorporate some of their glazes (or variations thereof;) however it occurs to me that to keep the ^6 soda palette from getting too inbred - all of us using the same recipes - I am going to have to reach beyond the published glazes, and create some of my own. Hopefully I can tweak glazes I am already using at ^10, as I like my glazes and would hate to have to simply retire the whole palette. Also, I really need a flashing slip that I can apply to bisque; maybe replace the EPK in the Smooth Orange with calcined kaolin?

Thursday, January 10, 2013

Thursday Inspiration: Catherine Boswell


See and read more about Catherine's work here.

Wednesday, January 9, 2013

It's a Fine Day to Mix Glaze

That's not a thing that you'll hear me say too often, but circumstances have conspired to make this the perfect glaze-test mixing day:
  1. I have my new digital scale to test out!  It's a 7001DX, which I got at bigceramicsstore.com; it was only about $50 with the shipping. (If you click the link it's about 3/4s of the way down the page.) Since it has a 7000 gm capacity, I think it will speed up my glaze mixing considerably, and offer fewer opportunities to screw up a whole bucket of glaze without even realizing it until I unload a kiln full of ruined pots. Not that that has ever happened to me, but it seemed like only a matter of time, when I had to weigh out ingredients in several increments.
  2. Val Cushing's  handbook arrived in the mail today; you would not believe the wealth of information in this spiral-bound volume. I'm so excited to read through it I can hardly sit still! Professor Cushing offers this book for $28, which includes shipping; you can get your copy by sending a note and a check to:

    1497 Water Wells Rd.,
    RD 1, Box 236 Alfred Station NY 14802,
    607 587 9193


    And - icing on the cake - Professor Cushing signed my copy! He says he likes the name Fine Mess Pottery. :) The book is also available at Amazon, if you prefer to shop electronically.
  3. I have a test firing coming up with Liz Proffety, a mid-coast potter I met through a Watershed event. Liz fires ^6, I fire with soda: together we are like chocolate and peanut butter. Two great tastes that taste great together: Cone 6 soda! I plan to use the Cushing handbook to re-formulate some of my glazes to see if firing to a lower temperature will work for me. As always, I will share my results here. 
Look at the time! At my latitude, daylight hours pass quickly this time of year, and it's well to make the best of them. 

Monday, January 7, 2013

Thanks, Pottery Making Info!

I couldn't be more pleased and honored to have been chosen as Pottery Making Info's #1 Top Blogger of 2012! If you aren't familiar, Potttery Making Info posts a great round up every month of what's happening on the many potter blogs.

It's delightful to think, as I am writing, that what I post is helpful and enjoyable to someone out there. I appreciate the honor, and the readership: let's make a great 2013!

Today is Monday, the day my classes at Portland Pottery begin again. I've got hand builders this morning, and beginners this evening; tomorrow is will be mixed skill levels, and then advanced and intermediate folks. I enjoy my break, but I miss my students, and the days start to run together. All in all I'm glad to get back in the saddle. I've been collecting some fun stuff that I am looking forward to showing them!


BTW, there are still spaces in these classes; you can register by calling Portland Pottery at (207)772-4334.