Friday, September 3, 2010

Boom Boom: Out Comes the Form

Burn it out? Or slide it out? Burn it? Or slide it? Burn or slide? These are the things I spend my hours wondering. How best to remove the arch form, now that the brick are in place. 

Burning is more fun by miles, but sliding is more practical, as someday I will need to rebuild the arch, and when that day comes, it would be nice to still have the form. So I'm sliding, if I can. It will still be necessary to burn out the frame holding up the form, so I get a little of both. Here goes!


Past the first ring of brick, which required a bolster in one place, but held...
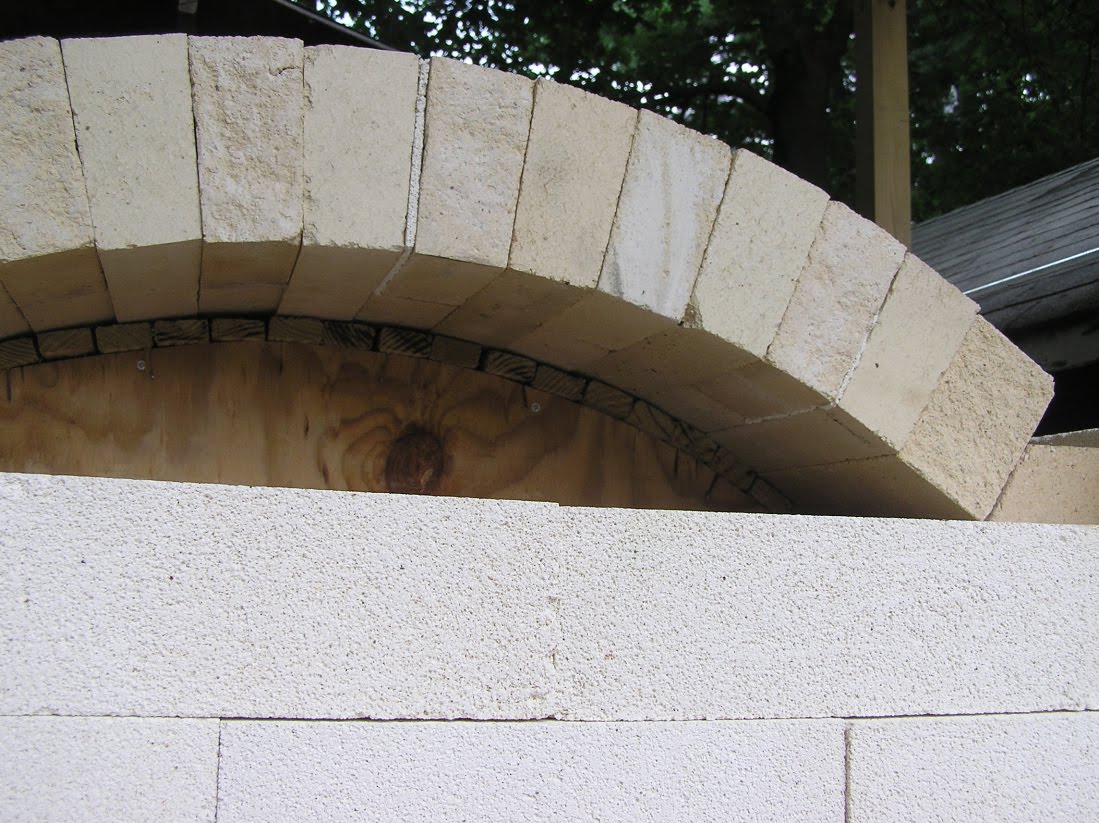


Uh-oh. Damn that quarter-inch plywood! Damn my cheapskate nature.So, the form will not survive anyway, which means Plan B is activated: Burn that baby out!

I had meant to take photos while the form was burning out, but as it happened I didn't care to set down my trusty hose once the blaze began. The spaces in front and behind the arch forn were still unbricked, so the flame was not entirely contained. A couple of notes: 

  • If you live in town, as I do, inform the fire department and your neighbors what is going on. There is going to be a world o' smoke. 
  • We've had a crazy dry summer, so I hosed off evrything near the kiln, including the beams of the roof over it. The tongue of flame jetting out of the front opening would have licked the shed roof five feet above it if I had not been there  damping it back with the hose.
  • I only burned enough to remove the actual  arch form. The support that was holding it at the proper height is  (obvs) very charred, but I will remove it by hand, becuase of the whole out-of-control smoke and flame thing. 
  • A half-brick that had not even seemed loose when I was building dropped precipitously when I slid the form forward. I propped it up until the brick around it could sink the fraction of an inch I knew would occur when the form was no longer holding them up. Once the other brick sank and pressed against it, my woould-be dropsy brick was pinned in place. 

Next on the to-do list: castable. 


Sunday, August 29, 2010

2 x 2 x 2

Arch construction is easier with two: 2 people; a 2 x 4; and a 2-pound sledge. Here's Doug tapping in a brick for a nice snug fit.

I was frustrated (so what's new?) because the charts in the Olsen book did not include a combination of brick for my span, which was 31". I know that is a weird span, and it ought to be 31 1/2", as brick are 9" long, but remember I had those weird-ass bricks. I had a little flexibility in the span, but the closest width on the chart was 33".That seemed like too much to fudge, as it would create turbulence in the flame, and with it inefficiency and probably a hot spot.

But I used the numbers suggested for the 33" span as a starting point to purchase arch brick, and then stood them in a ring on end to discover what combination of what brick got me closest to 31", without going under.  This worked out quite well, although, as it turned out, once I placed them on the form, I hat to switch out a row of arches for another row of straights, because they were much tighter with gravity pulling them together. 


I do have two "loose teeth;" Possible solutions include custom-cutting (or grinding) a hardbrick; stuffing the gap with a tiny sliver of softbrick, which I would glaze (shino) on the bottom; or..well, I guess those are the only options. I might try both: the sliver of softbrick up front where it will be (relatively) easy to replace if anything goes wrong, and a custom-cut brick in the back. 

I have the week of Labor Day off from the IPTOG, during which I hope to complete construction at long last. My to-do list looks like this:

  1.  Repair 'loose teeth"
  2. Build form to cast door blocks
  3. Mix up hot face castable and strike the blocks
  4. A trip to INFAB, probably in a rented truck, to get the necessary brick for the stack
  5. Mix up and apply insulating castable on top of the arch
  6. Build the stack. 

Wow, it looks more daunting all written out like that; but on the other hand it is an observably finite list, as opposed to the nebulous "all that stuff" label I had been applying to my remainig tasks. 

I should have cast the door blocks first, as waiting for them to dry will push off the first firing by as much as two weeks. Guess I should move them to the top of my list. 

Think good thougths for me, that Maine doesn't get clobbered by Hurricane Earl, and also that this week stays out of the nineties. Brick dust stuck to sweat is itchy. 

Arguing Eggheads


These s & P shakers will be in the first bisque, tentatively scheduled for September 5th, and then in the first soda firing, Sept. 10, unloading the 12th.

Problem Solved!


Since the Great Welder Meltdown that happened Independence Day Weekend, I have been dithering about how to get the welding done. Well: not just dithering. The plumbing; the stack; the arch form; I worked around the problem for as long as I could, and tried to work up my courage to call Augusta Tool Rental. Everyone kept telling me welding was easy, I'd be able to figure it out no problem. Still, I was intimidated, so I put it off and put it off. 

Last week a friend of ours was visiting, an elderly gentleman of Ivy League background. I showed him the progress I had made on the kiln and explained the obstacle: welding the frame. I told him I was thinking of just renting the equipment and figuring it out myself, at which he shook his head: "No, no, my dear. That's for the other folks."

"The other folks, Bob?"
"Yes, the ones who do that type of thing."

There was no use explaining to Bob that I have always endeavored to be one of those other folks, the ones who know how to do things, and anyway I realized that as wrong-headed and snobbish as the comment sounds, he was right in an essential point: there are people for whom 16 two-inch welds of iron bits would be nothing, no more difficult than throwing a board of mugs is for me. I knew welders existed, of course, but that was when the lightbulb went on that it makes no sense to struggle and dither when I could just get it done, in an hour. It's okay to have help.

Wednesday, August 4, 2010

Arch Nemesis

I so wish I had a camera! The arch form is complete, and it is such aa appealing object, itself.

I had one false start, when I decided I was very very clever and would avoid the tedious assemblage of slats by using a length of flexible hardboard bent over the form. Yeah, don't do that. The board is not THAT flexible, and tacking it down was almost impossible -- it kept pulling nails loose, and the flat sides weren't flat. Oh, for my camera! The result would have been funny instead of murderously frustrating if I had known I could share it.

Anyway the form is complete. Hopefully I will be able to get some shots of it before its duty is done.

Canoeing today, if the rain stops!

Sunday, August 1, 2010

How Things Stack Up!

Obstacles, obligations, and temperatures in the nineties conspired to make July a bust for kiln-building. No lie, the entire month was inchwise. And our camera went bye-bye, so you'll have to take my word  that it's August now and I am back on track. On the downside, I am bailing on a family vacation (well, half of it) to get there. I feel like a bugturd about it, but I was just so frustrated with everything taking priority: work, family, classes, vet appointments, gallery-sitting, everything.  All important stuff, to be sure, and most of it not optional, but at some point I had to declare that the kiln is important, too; otherwise it just won't happen. (See: Housepainting, three-quarters finished. )

Technically I got back on track yesterday, the very last day of July. I started building the stack finally, and while there is, predictably, some half-assery going on, I made good progress. Is it a bad thing if my tolerance for half-assery rises geometrically as this project wears on? I've reached the damper, for which I need a lintel brick that I don't have (natch), so I am going to build the arch form today, instead, and head to INFAB tomorrow. I need some more arch brick anyway. 

I was surprised to discover that INFAB doesn't sell skewbacks, so my choices are 3: have them shipped from Sheffield, MA (although, surely, now that I think on it, there must be another supplier of refractories closer than that: I can't believe that no one in the entire Boston metro needs kiln brick); make them out of castable (cheap and doable, but one more step in a project with too many steps already); or have INFAB cut them out of straights. So I guess I've got some phone calls to make, about pricing. I only need about 8, so how much can it be? 

Anyway. It looks cool and dry today, a perfect day to build an arch form. Feeling only slightly guilty, I will wave my family goodbye and get moving!

Saturday, July 10, 2010

Quick Kiln Updates

1)Like so many things, plumbing turns out to be not half the big deal I thought it was going to be, It helps that Home Depot will cut and thread pipe for you, at a ridiculously small price. (I did have an amusing incident at the register, when the cashier accidentally rung up my 37 inches of pipe as 37 feet. She was a little huffy and said the tag was written wrong, but really, does this look like 37 feet of pipe?) Any case the plumbing is ready to go. If I'd known it was so easy (and so cheap!) I might have repositioned the two burners that remained as they were in the old configuration, but what I've got will work just fine. Just storing it away in my Big Book o' Lessons.

2)We had to fire our free welder, for repeatedly (and persistently, after several requests to stop) making racist and homophobic remarks. You think you know someone...Anyway. That sucked, but some things are more important than kiln building. (Not too many, but some.) We have another friend who can help if we get ahold of him; if not, I do know a professional I can hire. Welding is not a task I'd try to learn on the fly. I am kicking myself for not learning to weld during either my undergraduate or graduate programs, when the metals sculpture studio was right next door. (I wasn't too interested in the metals, although I remember having an interest in one or two of the sculptors...)

Salad days at Watershed today! Hopefully photos tomorrow. 


Saturday, July 3, 2010

Get it Right the Second Time

I had to tear down one wall of the kiln this week, due to a 'clever" design change I made to the flue. I'm not sure what inspired me to re-work my original flue design, but I suspect that it was a desire to avoid having to manually cut soaps (lengthwise halves) from 3-inch brick. The second design looked like this:
I built all the way to the top layer of straights before I realized the problem. As you can see, if you follow the vertical line of the edge of the flue upwards, it butts right against the soda ports. Which means the soda ports will be hidden behind the stack wall. Nice going there, Ace! I spent a day trying to figure out how to rework the stack or the ports before I decided that was too much power to give to a mistake: better to correct my error than compound it.

So Thursday I took the back wall down, built the flue as I should have in the first place, soap-cuts and all. By this time I am an old hand at cutting hardbrick with a chisel, and though it was slow going it wasn't really difficult. 

Lessons learned: 1) Don't make design changes on the fly; and 2) the difficulty I am trying to avoid might not be the big deal I think it is. 

Saturday, June 26, 2010

Mother, Should I Build the Wall?

Ooops, too late, already did it! The walls are built, thirteen courses of three-inch brick. My next step is acquiring angle iron and tie rods, and welding the exoskeleton. Well, not welding it myself, exactly, but getting a friend with a portable welder to come out and do it. Portable welders must not be too uncommon, as I know two guys who have them, who have expressed a willingness to help.

When I started figuring out the stack, I discovered two things: One, I had placed a soda port too close longitudinally to the flue, such that the stack will block it; and two, the Fourth Law of Kiln Building, which states: However many cinder blocks you have, you need two more.

I finished my efforts last night in time to attend a reception at the Center for Maine Craft, a preview of the plates that will be featured at Watershed's Salad Days gala. (That's coming up July 10th -- hope to see you there!) I love those events for more than just free wine: I learn so much talking to other potters. Last night I came home with two helpful kiln-building ideas:

1) I could probably get away with building the arch out of superduty soft brick, despite conventional wisdom that the interior of a soda kiln must be entirely lined with hard brick. It is certainly true that the lower half of the walls take almost all the abuse; has anybody out there had any experience with this? I'd love to use IFB instead of hard brick, for the obvious reason of its (much) greater insulating qualities, but also because it's cheaper and easier to work with.

2) A potter whom I greatly respect mentioned that he had heard of people glazing the interior of their soda kilns, either with a very stiff glaze like a shino, or perhaps with a wollastonite glaze. He wasn't ready to vouch for this technique, not having tried it, but I am quite intrigued by it. It appeals to me on an aesthetic level -- remember, I am enamoured of kilns as beautiful objects -- and also because it seems like one of those ideas that is so obvious that you wonder why it isn't standard practice. I can't think why it wouldn't work. However, there is a world of difference between "Lori can't think of a reason" and "There is no reason" so again, I'd be delighted to hear from anyone who has seen this done.

It's a gallery-sitting day for me. so I won't make any progress today, except the mental work of figuring out my soda port problem. But do me a solid: poll your potter friends and let me know if anyone has tried either of the ideas I mentioned, and how it worked out. You can comment here or email me at info@finemesspottery.com with any news. It takes a village!

Sunday, June 20, 2010

Take a Header


The header row is a row of straights. Get it? Header-row? Hetero? Come on! That was funny. Oh. Heard it?

Anyway. The hricks in the header run perpendictular to the line of the wall, to tie the two walls together and thereby strengthen them. One should really place a header every fifth row, but because there were some many cuts, seams, and related goofiness on the rows containing the various ports, I wanted at least one solid row before the header, or it can't do its good work. In my case, because this will be a soda kiln when it grows up, everything on the hot face must be hard brick, so excepting the corners, the entire header is hard.

Reaching the header is a kind of milestone, and depending on the weather, I am inclined to take the day off and do some gardening; my other passion for which I have had precious little time. The next post might be of the see-what's-blooming variety. 

Friday, June 18, 2010

A Few Notes


It's starting to look like a kiln! Tomorrow I will finish the layer above the burners, which contains the burner lintels, and two soda ports. After that it is smooth sailing until it's time to build the arch; at which point I have another anxiety attack scheduled. The burner ports and the flue all look gigantic to me, but they are appropriately sized according to Olsen, and anyway it's easy enough to make a port smaller if need be.

Some mistakes I could have made, and didn't:

  • I almost forgot to leave a space between the cinderblocks under the stack to accommodate the propane pipe. Fortunately I noticed before I started building the stack, so it was no problem to correct.
  • All of the ports need to be surrounded by hard brick, not IFB. The soft brick I am using is only rated to 2300°, because it is cheaper, and more than sufficient for the exterior. However, the burner ports are going to exceed that temp. What I almost forgot was that the soda ports need to be hard brick also, because a) soda deteriorates IFB, and b) sliding a bit of angle iron, or even the nozzle of a sprayer, into a port at cone 9 is an excellent way to get a bunch of little pieces of grit stuck to the pots. 

While I was at INFAB purchasing the extra long brick to make the lintels over the flue, I asked the nice man to chop one of my own 3-inch brick in half. I didn't even have to play the cleavage card! (Just kidding. That card is a bit tattered these days.) He agreed so readily that I wondered if I should have asked him to cut a few of them; but that would have been pushing my luck. 

So anyway, tomorrow I will be cutting hard brick with my trusty chisel. Only a few...but that's a few too many. It's supposed to be 87° out, so I might take the afternoon off and head down to the river for a swim. 

Thursday, June 17, 2010

Aggravation, and a Happy Ending. I Hope.

I hate Lewiston. Sorry, all you Lewistonians, but it's true. All of the streets in Lewiston are one way. Worse, they are all one way in the same direction..

Okay, so that's not literally true, but sometimes it seems that way. I headed off for Lewiston Refractories this morning thinking I knew where I was going. I hadn't been there in a few years, but I knew once I got to the general area, I could find it. HA!

It wasn't where I thought it would be. It wasn't a little further along than I thought. It wasn't the next street over in any direction, and nobody in the neighborhood ever heard of it. But I didn't imagine it; I still have some inswool I bought there in 2006. I remembered that they changed their name to INFAB, and searched a little more. 

Finally I gave up and went into the offices of Oxford Networks, an internet service provider, and asked the receptionist to google it for me. Ha-ha, funny joke, they'd moved! I'd been driving around Lewiston in the traffic and pouring rain for almost an hour and I wasn't even on the right end of town. 

When I did find them, it turns out they don't sell 3" brick. Is that really such a weird size? The fellow there told me I couldn't get it anywhere in New England, they had to special order it out of Maryland. Which they weren't inclined to do for eight soaps, and a couple of stretchers. 

So now I am back home, figuring out a new plan. Sincce I don't want to dirve to Maryland, and I have plenty of 2 1/2 IFB. I think I am going to buy the additional hard brick I need and build the burner port/ flue layers of 2 1/2 inch brick. I was going to have to buy more hard brick for the stack anyway. The goofiness factor just went up a notch, but hey, there are no kiln police, right? As long as it works, I don't care if it looks like it was built by the cast of Ringling Brothers. I am off to re-do my brick count. 

Of course, this all means I will have to return to Lewiston tomorrow, and I hate Lewiston. It'll be a little better now that I really do know where I am going.