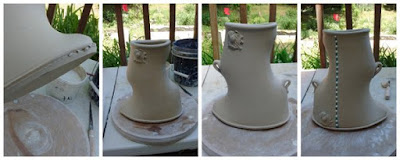
I almost always find that the more time I spend with a piece the better I like it. Logic dictates that there is some upper limit to this effect, or the correct amount of time to spend on a pot would be infinite, and nothing would ever get done (which - hmmmm - is not so different from what actually does happen.) I've been working on a series of thrown and altered oval vases that require so many steps I lose count.
Each starts as a thrown cylinder with no bottom. As I remove the cylinder from the wheel I press it into an oval.
After it has dried a short time - like, maybe an hour - I cut a vertical ogee shape out of one side, then bring the edges of the cut together, to make a swoop. I do the same thing on the other side, to give the piece an undulating shape.
After it reaches a leatherhard stage, I add a bottom; I find vases work better with than without! Now onto my favorite part: the decorating.
First a couple of springs! This sprig is a thistle, which a student made from an old belt buckle and gifted to me.
Next, handles; you know me and handles. Anything that is good without handles is better with handles. These are asymetrically balanced, landing at the outermost curves of the shape on each side.
But what is a vase without some slip-trailing? I like the crisp precision of the slip line contrasted with the animated quality of the profile of this pot.
I made several versions of this today, some with only one swoop, some with more sliptrailing, some less. It's fun to have the time to pursue an idea down whatever rabbit hole it takes me.
 |
| Another in the series. The green stripes are food coloring, to help me plan out the sliptrailing. |
Did you find this post useful? Drop a dollar in the tip jar in the column to the right!


1 comment:
Thank you! Love your work--I am also a 'more is more' potter. My studio-mates call me a 'maximal-ist'!
Post a Comment