Monday, June 20, 2016

More is More: A Step-by-Step

I almost always find that the more time I spend with a piece the better I like it. Logic dictates that there is some upper limit to this effect, or the correct amount of time to spend on a pot would be infinite, and nothing would ever get done (which - hmmmm - is not so different from what actually does happen.) I've been working on a series of thrown and altered oval vases that require so many steps I lose count. 

Each starts as a thrown cylinder with no bottom. As I remove the cylinder from the wheel I press it into an oval.
After it has dried a short time - like, maybe an hour - I cut a vertical ogee shape out of one side, then bring the edges of the cut together, to make a swoop. I do the same thing on the other side, to give the piece an undulating shape. 

After it reaches a leatherhard stage, I add a bottom; I find vases work better with than without! Now onto my favorite part: the decorating.

First a couple of springs! This sprig is a thistle, which a student made from an old belt buckle and gifted to me. 
Next, handles; you know me and handles. Anything that is good without handles is better with handles. These are asymetrically balanced, landing at the outermost curves of the shape on each side. 


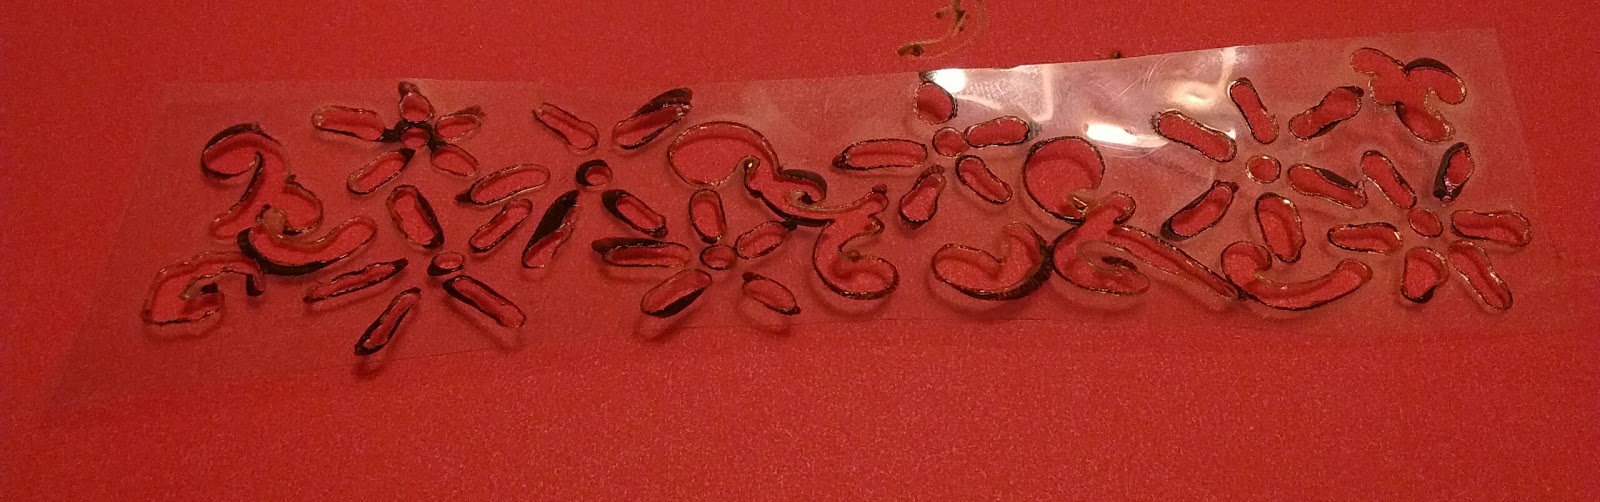
But what is a vase without some slip-trailing? I like the crisp precision of the slip line contrasted with the animated quality of the profile of this pot.

I made several versions of this today, some with only one swoop, some with more sliptrailing, some less. It's fun to have the time to pursue an idea down whatever rabbit hole it takes me.
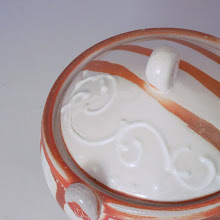
Another in the series. The green stripes
are food coloring, to help me plan
out the sliptrailing.


Did you find this post useful? Drop a dollar in the tip jar in the column to the right!

Thursday, June 9, 2016

Coming up: Raku, Seconds Sale


Saturday, June 25th 1 - 5, Raku Workshop at Portland Pottery. We'll be doing the American version, in which we place the glowing hot pots into combustible materials, then smother the flames to create strong post-firing reduction atmospheres. The results are ranges from oil-spot colors, to metallic copper to bright turquoise, and everything in between. Wear close-toed shoes and cotton clothing: there's gonna be some fire. Call Portland Pottery to register, or for more information. 207-772-4334

Saturday July 16th, Seconds Sale at Old Hallowell Days. I always have lots of pots that are seconds not because there's something wrong with them - although I've always got some of those, also - but because I made them during my class demos, so they are less detailed & finished than my "real" work; or because I try a new technique that requires some practice, so the first few are not impressive. That, or the technique ultimate does not become part of my toolkit, so those pots are sort of outliers from the rest of my work.

Gotta do something with all those perfectly good but not quite good enough pots! I sell some from my front yard, and this summer I will have an additional venue: the Central Maine Clay Artists are holding a Seconds Sale as part of Old Hallowell Day, July 16th, a Saturday. I expect at least three or four of us to participate, so there should be a lot to choose from.

Hope to see you at one of these events!

Sunday, June 5, 2016

Stencils Part Deux: Making My Own

I played with the commercial stencils for a while, as I mentioned last post, and I like them, but to me they look conspicuously commercial. Though I like the crisp perfection of the image - the better to contrast with the softer qualities of my work - I want to personalize it.

One thing I discovered is that I don't really know how to make a stencil. I mean, it seems pretty straightforward - just cut out wherever you want to slip to go - but there are some mental twists in there. The shape you want is the negative space of the stencil, which is the positive space of the drawing on the stencil; and because the image is a cut-out, and enclosed negative space has to be connected somehow. I don't know, it just felt like trying to screw on the bat pin wingnuts from underneath, or throw with the wheel turning in the opposite direction: my brain doesn't work that well in reverse.

So I looked at lots and lots of stencils, which also gave me a sense of how detailed I could get. I am going for a lacey kind of a look, floral or otherwise botanically-inspired...let's see what we got.


I started my copying over an image I downloaded, with some minor changes, just to sort out how to use the tool. The wood burner tool did turn out to be a good way to cut the stencils, but makes an unpleasant smell, due to the melting plastic. Maybe I should switch to the exacto? (My brain: but but [shows me image of blood and flayed-open hand]) Ugh, maybe not. Anyway I think it would be hard to get the same detail & smooth curves that the woodburner creates. Its use is not entirely intuitive, though: at first I used it as you would use a knife, pressing against a cardboard surface. This created jagged edges and little bits of partially melted plastic in the open spaces. Solution? Hold the plastic sheet up in the air while I burn out the pattern.

Next effort:

At this point I noticed that burning against a surface was not making a clean cut
Finished burning the design by holding the plastic in the air.
A nice thing about making my own stencils is I can make sizes and shapes that work for what I need to do. The commercial ones were too wide and stiff to work well on three-dimensional surfaces, but I can design these to any shape that works. Need a stencil for the rims of bowls? Why yes. Yes I do. So I'll make one!

Now to test them out...

Hmm...a little blobbier than I had hoped. (I know, I know, I'm being Goldilocks here: this one's too mechanical, that one's too loose...but I am aiming for a sweet spot.) I see some potential here to add some detail with a sgraffito tool, so that's one way to go.

The woodburing tool came with different tips...maybe I should try and find a finer one. 


Did you find this post useful? Drop a dollar in the tip jar in the column to the right!

Friday, June 3, 2016

Stencil Me In

You know who I love? Karen Dicenso! Karen is the voice on the phone (one of them) when you call Portland Pottery. (Like, say, when you call to register for the upcoming Raku Workshop! Seriously, do, it's gonna be fun.) She also teaches in the adjacent classroom during my Thursday pm class. We trade ideas back & forth.

Last week she had a good one: she brought a painting stencil to class, along with a "pounce" brush, and underglazed a slab with it. She then used that slab as the bottom of a thrown and altered form, and also to build a mug with the pattern on the inside. I loved the crisp qualities of the stencil image juxtaposed with the softness of the thrown oval, and the natural handbuilt wonkiness of the mug. I'm all about those tensions: human vs machine, tight v loose.

I wish I had taken a photo, but I didn't. Here's my version, though. I used thick porcelain slip instead of underglaze, to get more of a raised pattern. I also used a natural sponge to try and create more of a lacey texture; not sure how successful that was.
I call this my Georgia O'Keefe pot. Shake the Dew Off the Lily!
Because I all about those contrasts, the next time I tried this technique, I wanted to introduce a different quality of mark-making - my fave, slip-trailing. So the stenciled slip decoration is crisp, the trailed slip is squishy...I am sensing some possibilities here.


You can see the "pounce tool" here, in the slip cup. I use quotes because it's really just a bit of foam rubber on a stick! But it really does work better than a brush. You can get them literally anywhere. Okay, not literally: there probably isn't one in your coffee cup or nder your mother's couch cushions, or even at Hannaford. But any craft supply store will have them, as do Home Depot & Target.

This technique works best if you can stencil onto a flat slab - my efforts to stencil onto a thrown piece were...messy. It might work better with a small stencil, or a stencil cut from more flexible material, like maybe tyvek paper.

Those commercial stencils are all fine and good, but the thing I am really excited about? I bought a pack of blank stencil sheets! I also bought an exacto knife - those of you who know me know I am not fond of them, too many bad memories - but a friend told me they cut better with a woodburning tool, which I already have.

Going to try to create a stencil that captures the delicacy and profusion of bleeding hearts. Photos soon! I hope.


Did you find this post useful? Drop a dollar in the tip jar in the column to the right! 

Thursday, June 2, 2016

Two Deadlines

I can never get my act together enough to apply to the shows I'd like to be represented in. I always seem to miss the window between oh-that's-ages-away, no-need-to-think-about-it-yet and OOPS TOO LATE. Both of these shows are in the OOPS TOO LATE categories for me now - even if I had work that would fit thematically (and I do, actually!) I couldn't get it professionally photographed in time. Too late for me, but maybe not for you!

Strictly speaking, the Strictly Functional deadline has already passed, although they do have a late entry deadline coming up June 10th.

Applications for NCECA's first Annual show - replacing the Biennial & Invitational, I guess? - are due soon also. The title this year is The Evocative Garden, and man I am kicking myself because I could so have rocked that theme. But, oh well, I snooze, I lose! Maybe you don't though: deadline in June 15th.

Good luck!