Firing, as you may know, is a lot of waiting around, punctuated by fifteen seconds work every so once in a while. In the meantime, there's lots to explore at Watershed: woodland paths, the sculptural contributions of previous residents, sheep and pigs to coo at. (Not me. Well, I like the sheep. Pigs creep me out. I admit it's irrational, but I lived in Iowa, and read too many stories of pet pigs killing their incapacitated owners. Hey, some people don't like clowns! With me it's pigs.
But I digress.)
In the main house, there's a small sales area. While checking that out, I saw a really wonderful butterdish The construction was just folded slab but they were made of unglazed porcelain with an inlaid contrasting pattern. The inside was just the white of the clay. I couldn't tell who made it, or I'd happily credit the artist here. I set out to see if I could duplicate the clay-inlay technique.
I didn't want to use porcelain, because I didn't want the extra steps of (purchasing and) adding in mason stain, or screwing around with babying the piece along to keep the porcelain from warping and cracking. I used instead two contrasting stoneware bodies. If you attempt this, the claybodies will need to fire to the same temperature (thanks, Captain Obvious) and have approximately the same shrinkage rate. the claybodies I used are Laguna's 910 (brown) & 510(white), both ^10 bodies with shrinkage of about 14%.
I started with a thick slab. It needs to be thick to begin with because I will need to roll the holy heck out of it in the next steps. Then I set it aside while I made the pieces to inlay.

The inlay pattern is create by a millefiore technique. If you've ever played around with Sculpey, you may have used it to make buttons or beads. I rolled out two thin strips, one of white clay and one of brown. I spread water (not slurry) on the white one and place the brown on top of it, then rolled the rolling pin over the two together.


Starting on a long edge, I rolled the two like a jelly roll. You can roll from the short edge also, which is easier but gives you a more irregular spiral pattern on the finished piece. I roll the coil a little thinner to compress the two together, then...


Slice! I use a flexible metal rib to do this; the edge is thinner and therefore distorts the design less.There may be an air pocket in the spiral - this is no problem.
Now I brush some water on the thick slab and stick the slices on.


I move the slab + slices onto a piece of plastic, the lay another on top of that. You can roll harder this way, without the slab sticking to the rolling pin. I am wishing right now I had one of those heavy maple rolling pins, which are just great as objects but also better tools than puny kitchen rolling pins.


Keep rolling, flipping over occasionally.

Keep rolling, until there are no visible seams between the original slab and the added slices.
Peel off the plastic, and give it a couple of rolls with the pin, to compress the surface and remove the plastic texture.


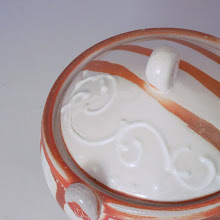
Now we've got a slab to build with. I let it breathe for a while to firm up, then just made a simple cylinder with a folded bottom, but you could make a platter or a butter dish or anything that you could make with a plain slab. Have fun, and if you try this send me photos!
I'll be building a mug with this slab, so I cut it to an oblong rectangle 5" wide by 13" long. Part 2, coming up!
Did you find this post useful? Drop a dollar in the tip jar in the column to the right!