True Grits and Other Stray Business
5 hours ago
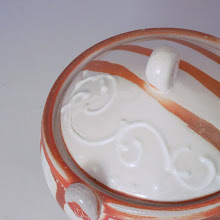
 Here's my most favoritest pot from last weekend's firing. Unfortunately it's a second...or is it? You be the judge. The glaze ran, as a result of a whole boatload of soda and salt, and stuck the pot to the shelf, creating a big, crusty goober on the bottom.
  (For the technorati, "goober" is the term for a blob of glaze or soda marring the pot; "woogie" is the name for a bit of kilnwash or a shard stuck to the glaze.) I inherited my father's trusty bench grinder, however, and between that and a Kemper stick, the bottom is smooth, although the goober is still visible. So, technically it's a second, but when is a flaw not a flaw? When it doesn't compromise the function in any way, and when the pot is more beautiful for it.
 You can sort of see which way I'm leaning.

Latex resist has an additional advantage over wax, in that it can be (in fact, should be) removed prior to firing, for a very sharp glaze line. This makes it forgiving, also: water-based wax needs to be scraped and sanded, should you put it where it doesn't belong, and never mind hot wax. Might as well either work with the goof, or re-bisque. After you remove the latex, you can then apply glaze to the bare area if you like, which allows multiple glaze applications with or without overlap. Here is the fired result of the latex-decorated butter dish above: 
A combination of trailed and brushed resist is the easiest way to make checkerboard pattern on a rounded surface, such as the exterior of a bowl. Put the bowl upside down on a banding wheel, and draw out the grid, like so:


One more, just because I like it:
Potters who are sticklers for straight lines can use a pencil and a flexible metal rib to draw them on before applying the resist.
Latex will utterly ruin your brushes, so don't use good ones. I use cheap, acrylic-bristle brushes, and run them a couple of times over a wet bar of soap before using, but this only delays the inevitable. I made the mistake of trying this with a good bamboo brush, and it was instantly destroyed, do not pass go, do not collect $200. And, if you use a glaze trailing pen, rinse the nib immediately after use (I blow through it to make sure it's clear) and store it with a piece of wire push through the nib. Otherwise you can kiss that good-bye, also.
I was hoping to fire these on Sunday, but the bitterly cold weather has me reconsidering. Anyway, I'll post the finished pots when I have them. Ciao for now!